Microsoft PowerPoint
Welcome back!
My previous post is about Microsoft Word. So now, I will share to you guys a basic features of Microsoft PowerPoint.
Basically, Microsoft PowerPoint has revolutionized the way people present information. Business professionals, academics and non-professional users create presentations and share them to clients, crowds, colleagues, students and friends. There isn't just one way to share a PowerPoint presentation. The program has several features that enable you to share a presentation.
1. Editing a Slide
When you first start PowerPoint, you'll have four basic choices:
- Create a new, blank presentation
- Create a new presentation based on a formatted template
- Open a recent presentation
- Open a presentation somewhere else on your computer or network
On the left side of the screen are presentations you had open recently. Click one to reopen it. At the bottom of the list, click Open Other Presentations to open one that isn't in this list.
On the right side of the screen, the Blank Presentation will give you exactly what the name says: a screen that's blank except for a content placeholder, and has no formatting. If you want a presentation that's already formatted, click one of the others. Even if you choose the blank one, you can still apply any of the formatting that's on this screen.
So to start with, choose Blank Presentation, and that's what you get:
2. Formatting a PowerPoint Slide
To apply the formatting from a template in the Windows version of PowerPoint, click the Design tab.
In Windows, if you roll the mouse over any of the samples, you'll get a live preview of the presentation with the theme applied. As long as you don't click, nothing gets applied. You're just seeing a preview. The Mac version doesn't display previews. You have to click one and apply it to see how it'll look, but you can always undo (press Command-Z).
There is more here than immediately meets the eye. To see several rows of templates, in Windows click the Down Arrow on the right side of the list,Click the arrow to see more themes.
To see some alternate formats for the theme you chose, do the same in the Variants section on the right. Roll the mouse pointer over a few of them, then click one you want
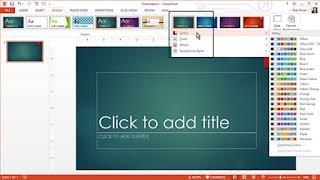
If you click the Down Arrow of the Variants list, you can choose different color schemes, fonts, effects and background styles for the template you just choose
For example, you can choose Colors, and get previews of different color sets.You can also preview and choose font sets from the same menu:
And you can also preview and choose a background style, if you want.
3. Adding Text and Inserting Slides
Now let's enter some text. Even though the slide says "Click to add title", you don't have to click anything. Just start typing! The text will automatically go into the Title placeholder.
There is also no need to click to add a subtitle. After you type the title, with the text cursor still at the end of the line, press Ctrl-Enter (Command-Option-Return on the Mac) to put the text cursor in the subtitle box, and type.
Notice that as you edit and format slides, the thumbnails on the left side get updated.
To add a new slide, just press the same shortcut: Ctrl-Enter (Command-Return on the Mac). In the slide that appears, do like before: type a title. As with the title slide, you don't have to click in the "Click to add title box". Just start typing.
For the slide content, you have a choice. You can create a bullet list or you can click one of the six symbols in the middle to insert a table, image or other type of media.
For this exercise, let's create a bullet list. As with a title slide, press Ctrl-Enter (Command-Option-Return on the Mac) to put the text cursor before the first bullet.
Type an item and press Enter to get another bullet. Until you type, the new bullet will be a grayed-out placeholder.
Then type a second item. As soon as you start typing, the bullet will look normal.
To create a second-level bullet, use the Tab key: press Enter to get a third line and a new bullet, then immediately press Tab. Now type a sub-item.
Second level (and third, fourth and fifth level) items work just like first level items. Press Enter to get a new line for another item, then type.
How do get the text cursor back to the first level? Use Shift with the Tab key: press Enter to get another second level item, then press Shift-Tab to bring the cursor back to the left margin. Now you can type more first level items.
At any time, you can go to a slide, click at the beginning of a line of text and press Tab or Shift-Tab to increase or decrease the outline level.
When you're done typing the last bullet, again press Ctrl-Enter (Command-Option-Return on the Mac) to get another slide.
Using these techniques, create one more bullet slide. If the text cursor is no longer inside the text box, here are two ways to create a new slide:
- Press Ctrl-M (Control-M on the Mac)
- On the Home tab, click the New Slide button on the left side of the ribbon
Using the techniques described above, create one more slide.
Done! That's all for some of basic features that you should know to use it on Microsoft PowerPoint.


Comments
Post a Comment